Andy's second game finished early today so we popped downstairs at Maelstrom for a couple of quick games of Kill Team. I ran the following:
10 Grey Hunters, 2 x Flamers
6 Fenrisian Wolves
Andy took:
7 Sternguard w/Power Fist
In the end I won both games through sheer weight of numbers. The Wolves were quick enough to get to the Sternguard to tie them up while the Grey Hunters moved into position. A few things about Kill Team in general came out of the two games tho:
1) That Powerfist that is normally hidden in you squad becomes a much bigger target for shooting when he's on his own.
2) Despite that, some kind of weapon that either increases strength or removes saves is needed once you get into combat. We had a Sternguard and 2 Fenrisian Wolves go four rounds of combat because they couldn't wound each other or if then did wound, saves were passed.
3) It's a bit of a pain having to roll individually for every member of your Kill Team when you want them to run.
I had high hopes for a Deathwatch Kill Team using Sternguard but now I'm thinking that if you have that few models you're probably as well to go Thunder Hammer/Storm Shield Terminators. Sternguard are just slightly too easy to kill. Conversely, the Fenrisian Wolves did really well do to the amount of cover giving 4+ saves. So, I think a large horde would also do quite well at Kill Team.
The key thing is to remember that Kill Team is different to full blown 40K. Make sure you take out the most powerful enemy models first and wherever possible double up in combat (or even better treble up!) Actually, maybe it's not so different after all...

Saturday, 1 May 2010
Thorghir the Grim

Named for his taciturn appearance on the field of battle, Thorghir was a member of Berek Thunderfist's Wolf Guard. He was cut down by 10 Howling Banshees when leading a counter-attack against an Eldar warhost. Despite his wounds, he somehow survived and was encased within a Dreadnought so that he could continue to serve the Chapter. He still carries his favoured weapon from his days of flesh - a fearsome Assault Cannon.
From a tabletop point of view, his highlight has been a Rocky II -esque moment when an Ironclad and Thorghir managed to take each other out in the same round of combat.
Friday, 30 April 2010
Taking a knife to a tank fight
Okay, I'm stealing Andy's idea here to talk a bit about rules; specifically assaulting a vehicle. On Wednesday I assaulted one of Andy's Razorbacks with my Lone Wolf. Now, the vehicle was immobilised so I hit it 3 times and then, because I wasn't locked in combat, walked away and re-assaulted it in my next turn, hitting it 3 more times. We forgot two key things. Firstly my Lone Wolf forgot how to use his Thunder Hammer and failed to destroy the Razorback. Secondly, and more importantly for this article, I forgot the rule about vehicles that don't move. It's there on page 63 of the Big Rule Book - if a vehicle doesn't move (or just pivots) you get to attack it in the vehicle's assault phase. Okay, I might have done nothing with the additional 2 attacks but I could theoretically have destroyed the Razorback, letting me charge the squad inside in my next turn. It would have made no difference to the overall result of the game but this sort of oft forgotten rule could make the difference in a close run game.
Tuesday, 27 April 2010
1750 Space Wolves
So, I've got a game against Andy tomorrow, which will be his last warm up game before the Warp Storm tournament at the weekend. Now, I'm slightly tempted to use my list from two weeks ago but I feel that it's just too much of a hammer army. Hence, I've put together a more balanced list, the kind that I'd probably take to a tournament myself. Also, I thought I'd actually post some of my thoughts that went into this selection rather than just posting a list in a vacuum. So, without further ado:
Rune Priest, Chooser of the Slain, Living Lightning, Murderous Hurricane
Rune Priest, Chooser of the Slain, Living Lightning, Jaws of the World Wolf
The best psychic defence in the game (apart from the soon to be nerfed Inquisition) and D6 S7 infinite range shots per turn. Nice. The Choosers stop infiltrators and add 1 to the Rune Priests' BS. Murderous Hurricane is awesome if only for its Difficult/Dangerous Terrain effects. Jaws of the World Wolf can be a bit hit and miss, especially against armies with good Initiative values. However, when it's good, it's very very good.
5 Grey Hunters, Plasma Gun, Rhino
5 Grey Hunters, Plasma Gun, Rhino
The Rune Priests go here and Living Lightning out of the top hatch. First targets are AV10-12 or Heavy Weapons teams on the board edge (especially if they have poor armour and Leadership. LL can really do a number on Lootas and once they fail that first test, it's goodnight from them) The Plasma Gun offers even more S7 goodness.
5 Grey Hunters, Meltagun, Razorback
5 Grey Hunters, Meltagun, Razorback, Twin-Linked Assault Cannons
5 Grey Hunters, Razorback, Twin-Linked Lascannons
The meat of the army. While the two rhinos can quite happily sit on objectives all game, these are to force the enemy off their objectives and do some killing. If I had the models I'd probably go with Lascannon/Twin-Linked Plasma Gun turrets as they are so badly affected by a weapon destroyed result. The Lascannon Razorback gives some really good range letting me hit threats before they get too close.
6 Wolf Scouts, Meltagun
One of the best units in the Codex; these guys are just so versatile. If the enemy has something in their backfield that you need to take care of then you can operate Behind Enemy Lines. They can do the same if you think you might need some back-up near any of the board edges. Or if there aren't any good targets (ie against a horde list) they can Infiltrate and act as a speed bump.
Lone Wolf, Terminator Armour, Storm Shield, Thunder Hammer
This is one of my counter charge units. He runs up behind the wall of armour and then jumps out and either kills vehicles or Independent Characters or he tarpits squads. With Eternal Warrior, Feel No Pain and Saga of the Beastslayer, this guy is a bargain for 85 points. Plus if he is killed he doesn't give up a Kill Point.
Dreadnought, Assault Cannon
Another counter charge unit, primarily to deal with other dreadnoughts, especially ones who enter via Drop Pod.
6 Long Fangs, 4 Rocket Launchers, Lascannon
6 Long Fangs, 4 Rocket Launchers, Lascannon
Some more long range fire power. Krak Missiles will Instant Kill nearly all of the main infantry in the game (and more importantly, the Doom of Malantai!) plus these guys have awesome range to take out vehicles.
2 Land Speeders, Multimelta, Heavy Flamer
I'm still not sure whether to run these as a pair or separately but they stay as a pair for now. These guys are AV14 hunters or against certain armies they can use the Flamers to really ruin someone's day.
Vindicator, Siege Shield
Still not sold on this but I think that most people will see this and be worried enough to shoot at it leaving the rest of my vehicles alone for a turn. It's got short range and is vulnerable to a single weapon destroyed result taking it out of the game but it can work as pure area denial, especially for anyone Deep Striking. For 5 points less I could have a Predator with Lascannon Sponsons which feels like a more logical but less fun choice.
So, there it it. The plan is to pop transports at range and then shoot the enemy as they walk towards you. When enough are dead jump out of the transports, finish them off and hop onto an objective. Obviously no plan ever survives contact with the enemy but hopefully I've got just about enough firepower and assaulty capability to see it through.
One final word on this list; it's 18 Kill Points which does feel like quite a lot at this level. Mitigating that I do have 5 scoring units, all meched up and hopefully enough killing power to take out more than I lose. Hopefully...
Tournament WIP
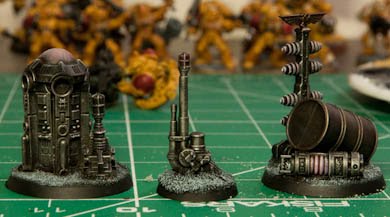
It's been a few days of manic painting so I just thought I'd share a couple of pics of the objectives I've made (Tournament rules require that you bring at least two objective markers with you) and my Librarian HQ along with the two very nearly finished Sanguinary Priests.


I've just got a couple of small details to do on the Priests, then I have to just finish of my Land Raider Melta Gunner. Last of all I have to paint two Dreadnought arms and file down my Blood Talons (green stuffed last night) and paint them and I'm done. Should be no problem :)

I've just got a couple of small details to do on the Priests, then I have to just finish of my Land Raider Melta Gunner. Last of all I have to paint two Dreadnought arms and file down my Blood Talons (green stuffed last night) and paint them and I'm done. Should be no problem :)
Monday, 26 April 2010
Know your rules
It may seem an obvios statement but if you want to enjoy the game then you need to know the rules! Now the BRB is, by definition, BIG so it's not really practical to try and memorise the whole book in one go. What you need to do is to ensure you know the basics of movement, shooting and assault and then tackle the more obscure rules as the situations occur. The imortant caveat to this is that you must take the time to ensure you interpret the rule correctly.
This week I was asked about tank shocks by my opponent and I explained how I thought it worked, he was happy about the explaination and we played it as I described. However when I got home and re-read the rule I realised i'd got a key part of it wrong. So as a result I feel inspired to do an occasional post on uncommon rules and/or interpretations of unclear rules. I think we'll start with Tank Shocks!
The idea of a tank shock is to force a morale check on an opponent's unit or units in an effort to move them. It is declared in the movement phase and may be performed by any vehicle described as a tank by its stat line. In order to perform a tank shock you must declare how many inches you intend to move (at least the vehicle's cruising speed) and move the vehicle in a straight line.
Any enemy units that the tank passes through must take a morale test. If the test is passed then the tank passes through the unit with no effect, if the test is failed then the unit falls back towards their table edge. If the unit passes the morale test then one member of the unit may elect to make a "death or glory" attack against the vehicle's front armour, however if the attack is failed the model is removed.
Those are the basics of the tank shock rule, as always though read the section in your main rule book again to ensure you have fully understood it. It never hurts to read the main rule book again!
-- Posting on the go.
Sunday, 25 April 2010
Clash of the Titans

I didn't think I was going to make it to Warhammer World this week so I didn't pack my camera. However I did get this pic on my phone of Graham's Defiler taking on Andy's Dreadnought. The Dread managed to hold the Defiler up for a turn which was a two-edged sword as it meant that Andy couldn't shoot it during his turn.
Subscribe to:
Posts (Atom)
LinkWithin
